Page 29 of 74
Re: What have you done to your Pajero today?
Posted: Wed Apr 10, 2013 7:48 am
by andrew.ashton
Yesterday:
Replaced my failed second battery with a Varta Deep Cycle battery and rewired the cr%%%ppy job that a certain vehicle outfitter did a few years back.
Changed the alternator belt pair and aircon belt as a preventative measure. What a mission - they should tell you that you need a special tool for this (i.e. a tall thin Japanese with VERY small hands and wrists to get around the fan). I don't recall ever having had those replaced in the 7 years I have had the vehicle (70k to 235k km) - the old ones were in surprisingly good condition.
Also saw I have a rear diff right hand half shaft oil seal weeping (that will teach me for changing the diff oil). Got the replacement seal and a new circlip at Sandown Motors (thanks, Alfred) so off to friendly indie today for that to be fixed. I don't think it is the known companion shaft issue because I have replaced before for the newer design.
Re: What have you done to your Pajero today?
Posted: Wed Apr 10, 2013 10:48 am
by andrew.ashton
andrew.ashton wrote:Also saw I have a rear diff right hand half shaft oil seal weeping (that will teach me for changing the diff oil). Got the replacement seal and a new circlip at Sandown Motors (thanks, Alfred) so off to friendly indie today for that to be fixed. I don't think it is the known companion shaft issue because I have replaced before for the newer design.
Oil seal and "circlip" replaced in about 1 hour while I waited - Thanks to Stan at
Scorpion 4x4 Hire and Services
Re: What have you done to your Pajero today?
Posted: Sat Apr 27, 2013 2:22 pm
by RoelfleRoux
My car is now halfway to the next scheduled service and I gave it a shining new (OEM) oil filter and fresh new DELO, in preparation for the Damaraland trip that is planned to kick off mid May.
A new brake light bulb was also needed and is in and working fine. It is required to push the new bulb in all the way until it clicks into place - a little more force was required than I would have liked to exercise on the flimsy little piece of glass.
The tranny oil is the smallest of margin below perfect. Think I'll drop in at the dealers one afternoon to see if they will just top it up for me. Luckily it still looks, smells, feels and tastes perfect.
On Tuesday afternoon I also had the front and back wheels rotated and balanced.
What have you done to your Pajero today?
Posted: Sat Apr 27, 2013 3:34 pm
by Stephan
I also experienced the dreaded rear diff companion shaft " pull out", so I ordered the required parts last week.
Last night I removed both companion shafts, cleaned the clip grooves on the lathe, fitted the new clips, fitted new seals in the diff, fitted shafts, bolted up drive shafts and gave the diff fresh axle fluid.
Hope it will last anther 225000km before it pulls out again.
What have you done to your Pajero today?
Posted: Tue Apr 30, 2013 9:29 am
by Stephan
Serviced my pajero yesterday.
I just realised how little pride the dealers have in their work. I serviced my vehicle at the dealers up to 225000 km and decided to do it myself from now.
There were three stripped bash plate bolts, and the hex head on my sump plug is almost round.
While I had the bashplates off I replaced the font diff axle fluid. I had to use a power bar and 24 socket to loosen the drain plug. This bolt should be tightened to 15-20 Nm. I must have pulled at least 50-75Nm. Both copper washers on the diff have been re used several times. The washers are R 6 each from the dealers.
I am really glad that I do it myself now.
Engine sounds very smooth with the Delo 400 oil.
Re: What have you done to your Pajero today?
Posted: Tue Apr 30, 2013 8:57 pm
by RoelfleRoux
"Engine sounds very smooth with the Delo 400 oil"
Stephan,
I measured the noise of my V6 at idle before and after the Delo service. Went from 69dB to 64dB, and I'm telling myself I can hear the difference with my own ears

Re: What have you done to your Pajero today?
Posted: Mon May 06, 2013 1:53 pm
by Lock
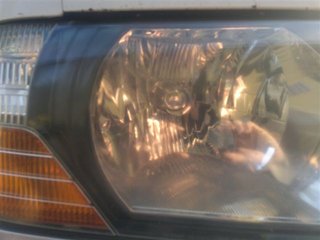
Yesterday I changed the Beast’s lights from this
To this!

- After
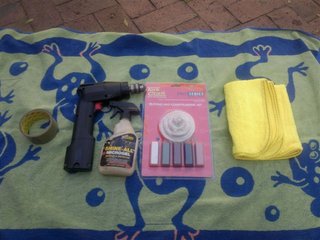
After many years of hard work, sunshine, dirt roads and being caught in a sandstorm in Namibia, the Beasts headlights had started to look a bit dull. The plastic had yellowed and the surface was pitted and faded. Could not source the plastic cover on its own, and new headlight units are in excess of R 2 000 each. My mechanic recommended brake fluid and toothpaste, but when I asked him what flavour toothpaste he got all huffy and refused to elaborate. Go figure. Anyway, some research showed that you can get off the shelf restoration kits, but the one I found at the spares shop was R 570.00 Luckily I found a buffing and compounding kit for R 150 at Builders.

- tools
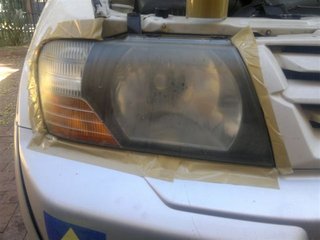
Step 1, mask the headlight. If you open the bonnet, you don’t have to mask the bonnet. (Lesson 1)

- Using the wrong tape....
Step 2, give it a proper was, getting rid of all the oils and tar. I used pine gel.
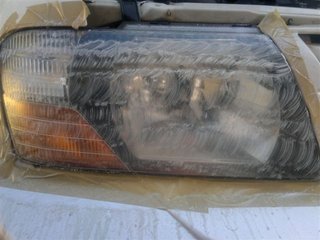
Step 3, polish using increasingly finer compounds. I used the cordless drill, as I was worried about melting the plastic if using too high a speed. Wet all the time.

- wet polish
Step 4, wash again and seal once dry. I sealed mine with wax, but next time I will do a lacquer spray coat.
There was a fine layer of flaky plastic on the top surface. On the second headlight I scrubbed this off with a spongy pot scourer, but this left fine grooves. I was in too much of a hurry to get these out properly, and the battery on the cordless was getting decidedly weak. Don’t try and rush the job (Lesson 2).
So I now have much improved light at night, and the Beast looks more like a beauty…. For 150 bucks and a couple of hours elbow grease.
Re: What have you done to your Pajero today?
Posted: Mon May 06, 2013 7:08 pm
by andrew.ashton
Lock wrote:Yesterday I changed the Beast’s lights from this
To this!
Great tip, thanks.
Re: What have you done to your Pajero today?
Posted: Mon May 20, 2013 8:01 am
by Nick Gibson
Seeing as I had some time of my hands Sunday I decided to sort out an irritating "klunk" noise on the back of my Pajero. Turns out it was the upper shock/damper mounting that had some play on it causing the sound to travel through the chassis.
I could not tighten the top nut anymore to take up the play on the insulating upper and lower rubbers, so I removed the shock and found a small tubular spacer (31mm long) on the upper shock thread that kept the two big washers a certain distance apart which was stopping me tightening up any further. I simply ground the spacer shorter (26mm) to allow me to tighten up to top shock nut to take up the play in the rubbers which was causing the "klunk".
I also have a "whine" noise emanating from one of my idler pulleys on the accessory belt. I removed the belt to have a better look and removed both plastic and steel idler pulleys to see which one was the culprit. Once they were both off I saw that the cast aluminium accessory holder that is mounted on the front of the engine had a loose bolt. I removed the viscous fan (what a PITA!!!), to have a better look and found one bolt stripped and 3 missing; see pics. It also seems as if someone had cut a new thread onto the loose bolt (coarse thread, not fine) but this has also since stripped as I cannot torque it at all

....
I am worried now as I only have 3 bolts holding the accessory holder on now, I will phone mitsu to see if they have the bolts in stock. Any ideas on how to tap a new thread if they all are stripped, the two bolts are long 110mm, other two shorter at 60-75mm?
Re: What have you done to your Pajero today?
Posted: Mon May 20, 2013 8:54 am
by andrew.ashton
Nick Gibson wrote:Seeing as I had some time of my hands Sunday I decided to sort out an irritating "klunk" noise on the back of my Pajero. Turns out it was the upper shock/damper mounting that had some play on it causing the sound to travel through the chassis.
I could not tighten the top nut anymore to take up the play on the insulating upper and lower rubbers, so I removed the shock and found a small tubular spacer (31mm long) on the upper shock thread that kept the two big washers a certain distance apart which was stopping me tightening up any further. I simply ground the spacer shorter (26mm) to allow me to tighten up to top shock nut to take up the play in the rubbers which was causing the "klunk".
Good tip - thanks
Nick Gibson wrote:Any ideas on how to tap a new thread if they all are stripped, the two bolts are long 110mm, other two shorter at 60-75mm?
What about using a thread-forming liquid? Permatex and Loctite, amongst others, make this stuff. If you search those product names + "thread forming liquid" on Google / YouTube you will find available products and How To videos.
Good luck with finding / achieving a suitable fix.