User avatar
Affiliate Member
C V Joints Shot
Got that ghastly death rattle that a knackered CV makes just before it fails. Turned out to be the front inner joints and I thought that it would be an easy change over, just pop in two new CV joints and you are done. With the golfs I have this is a regular exercise and a niggly task that takes all of an hour to complete with a cost of about R200-00.

But was I in for a surprise. To find C V joints is next to impossible and the best part is that Mitsubishi does not even have a listing for them :evil: , so much for stealer support, they could however get me two complete side shafts at a mere R 7600 per side :shock: I hope this includes Vaseline. :evil: Had Jonesy not been such a helpful guy I might have forgotten that I am a gentleman and told him what to do with the golden side shafts. :twisted:

With a trip to the Kgalagadi getting closer I had to do something and fast, time is running out. To top it all my Pittman idler arm is also starting to get play in the bushing and I remembered 4e having done his gen1 rebuild. I searched for the post and as luck would have it there was a reply with suspension parts in Pretoria's number and I decided to give them a ring to find out if they had the idler arm in stock, when asked how many I need I took my chances and casually enquired about the C V joints. Much to my surprise they had stock of both at a cost of about R700 each :o

I will be heading off to Pretoria armed with my samples, with a bit of luck the front end of the Kasper will be as good as new. As these guys specialise in suspension parts I have decided to replace the ball joints, tie rod ends and all the rubbers as well.
Henk Bannink

Some people are wise, some people are otherwise
User avatar
Affiliate Member
Re: C V Joints Shot
Got a whole box full of groceries and started to rebuild the side shafts.
I must compliment the folks at Suspension parts in Pretoria, I got there just as they were closing and Shannon sorted all the bits and bobs that I needed with no problem.
Some of the new goodies
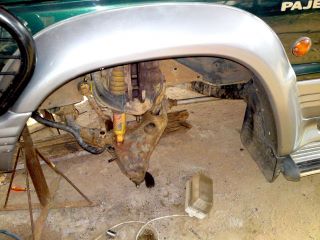
I had to strip the pajero down to get samples of the offending parts so that the splines could be matched. While it was in this state I decided to replace the ball joints and tie rod ends as well as there was a bit of play in the ball joint on the lower left hand side. I suppose 333,350 km does justify new parts :twisted:
Stripped down
Stripped down
The strip was straight forward with the worst part having to drop the bash plate to get proper trestles under the chassis.
Once the vehicle is supported and the wheels are off remove the dust cover on the axle and take the retaining circlip off.
Next remove the brake caliper and tie it up out of harms way. Unless you plan on replacing the disk pads do not get grease or oil on to them it would seriously affect your braking.

The next step is the tricky one and a lot of folks are hesitant to remove the taper fit pins of the ball joints and tie rod ends. All it requires is a sharp blow with a heavy hammer, start by loosening the nut from the tie rod end, do not remove it completely as it serves to protect the threads if the hammer slips. Use a good heavy hammer (mine was a 1kg unit) and hit the ring around the taper pin hard, the shock will release the pin and the tie rod end will drop out, you might need a few blows to have success. Do the same with the ball joints starting with the upper one.

When the wheel hub is loose gently pull it from the splines of the side shaft taking care not to lose the seating ring in the front or the thrust washer on the back of the shaft. Cover the hub in a dustbin bag to keep dust and grit out.
The left and right shafts are different in that the left hand side is a splined shaft that fits in to the diff and just pulls out while the right hand side has 4 bolts and nuts holding a flange to the drive on the diff.

The new CV joints was slightly different than the old ones in that they are of the 3pot type instead of the ball & cage type used by Mitsubishi. this is similar to the outer cv joints and much stronger than the original parts.

With the outer cage removed and the old grease cleaned the damage to the centre drive can clearly be seen. This is what causes the "death rattle"
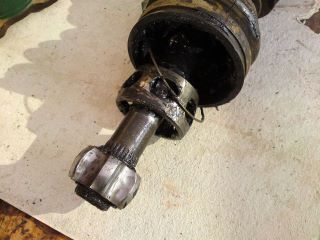
damage to oldCV
damage to oldCV
Use some old news paper to clean out the bulk of the old grease. to split the CV one has to remove the clamp on the rubber boot and pull it back to expose the inside. the outer housing is held by a wire retaining ring just inside the steel section, once this is removed the outer cage can be taken off. The inner cage is held buy a circlip on the end of the splines and poses no barrier to a pair of circlip pliers. once the rubber boot is pulled from the shaft most of the old grease will come off with it and the shaft can now be cleaned for the new parts.

It is important to work clean as any dirt will make a grinding paste and kill the CV. Slide the new clamp over the shaft followed by the new rubber boot. Nothing is more frustrating than finding out one forgot the boot when everything is fitted.
Slide the new center cage over the splines and fit the new retaining circlip.
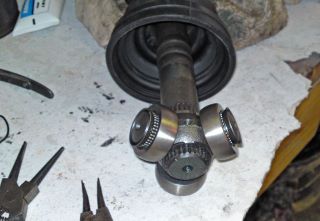
New center portion fitted
Put half of the tube of grease supplied in the lower part of the new cv and work it in to the bearings on the center cage, the rest goes in to the boot and on top of the cage. Put the two halves together and fit the retaining ring. Slide the boot over the outer cage and in the grooves on the shaft and tighten the clamps. One side shaft ready for installation.
CV ready for installation
Henk Bannink

Some people are wise, some people are otherwise
Stevedj
Re: C V Joints Shot
Hi Henk, what did they charge you for the box full of goodies?. i have a 2nd gen Pajero Shogun and need to replace the boots on both drive shafts. i have a funny feeling that the innes need to be replaced aswell...

regards
Steve
User avatar
Affiliate Member
Re: C V Joints Shot
With the drive shafts rebuilt it was time to tackle the ball joints and pitman idler arm, this was a straightforward remove and refit of new parts, keep the torque wrench close and you can not go wrong. I did not replace the tie rod ends at this stage as I need new tyres as well in the not too distant future and will do it when the new tyres go on and the wheel alignment is done.

Installing the side shafts and putting everything together went quicker than expected. The anti sway bar rubbers and disk brake pads were also replaced and all the grease points given a once over.

Wit everything assembled and the tools cleaned and put away it was time for a test run, what a difference a few new bits can make, Kasper behaves much better now and when 4 wheel drive is selected there is no more clicking and rattling coming from the front.
I think the new 3pot style joints are stronger and better suited to the heavy workload expected from a 4x4 but best of all was the cost of the better aftermarket joints compared to genuine stealer parts.

Costs were:
  • Cv joint MI 718/ R 550-00
    CV joint MI-715/26splns R 550-00
    Idler arm IA5570 R 895-00
    Upper ball joint BJ 1060 2off R 500-00
    Ball joint lower left BJ1073L R 340-00
    Ball joint lower right BJ1073R R 340-00
For anyone wanting similar bits & bobs it was sourced from Suspension Parts and the guy I dealt with was Shannon
they are in Pretoria west at 192 Vom Hagen st 012 327-8898

This was not a difficult repair and the main point to remember is to work clean, grease and grit has a nasty habit to form a grinding paste that will destroy your handy work.
A tip to remember when replacing the wheel hub without lifting the vehicle is to loop a length of chain around the top arm and the jack base. When lifting the lower arm this will have the effect of compressing the torsion bar to get the ball joint nut on.
Henk Bannink

Some people are wise, some people are otherwise
User avatar
Affiliate Member
Re: C V Joints Shot
Stevedj wrote:Hi Henk, what did they charge you for the box full of goodies?. i have a 2nd gen Pajero Shogun and need to replace the boots on both drive shafts. i have a funny feeling that the innes need to be replaced aswell...

regards
Steve
Prices are quoted above and I am sure that if you phone them they will be able to supply you with a decent boot. On my baby I replaced the boots about a year ago but the parts I got from the local midas was not up to the rigors of off road stresses and when I removed them they were perished and close to failing. The gen2 has a 3pot style joint on the outer part of the shaft and this one rarely gives problems as long as the boot is in tact, the inner on the other hand is a 5 ball and cage style CV and in my opinion a bit light in the pants, but after 335k maybe I am complaining unnecessarily :twisted:
Henk Bannink

Some people are wise, some people are otherwise
Re: C V Joints Shot
HBannink wrote: Tue Aug 10, 2010 1:03 am With the drive shafts rebuilt it was time to tackle the ball joints and pitman idler arm, this was a straightforward remove and refit of new parts, keep the torque wrench close and you can not go wrong. I did not replace the tie rod ends at this stage as I need new tyres as well in the not too distant future and will do it when the new tyres go on and the wheel alignment is done.

Installing the side shafts and putting everything together went quicker than expected. The anti sway bar rubbers and disk brake pads were also replaced and all the grease points given a once over.

Wit everything assembled and the tools cleaned and put away it was time for a test run, what a difference a few new bits can make, Kasper behaves much better now and when 4 wheel drive is selected there is no more clicking and rattling coming from the front.
I think the new 3pot style joints are stronger and better suited to the heavy workload expected from a 4x4 but best of all was the cost of the better aftermarket joints compared to genuine stealer parts.

Costs were:
  • Cv joint MI 718/ R 550-00
    CV joint MI-715/26splns R 550-00
    Idler arm IA5570 R 895-00
    Upper ball joint BJ 1060 2off R 500-00
    Ball joint lower left BJ1073L R 340-00
    Ball joint lower right BJ1073R R 340-00
For anyone wanting similar bits & bobs it was sourced from Suspension Parts and the guy I dealt with was Shannon
they are in Pretoria west at 192 Vom Hagen st 012 327-8898

This was not a difficult repair and the main point to remember is to work clean, grease and grit has a nasty habit to form a grinding paste that will destroy your handy work.
A tip to remember when replacing the wheel hub without lifting the vehicle is to loop a length of chain around the top arm and the jack base. When lifting the lower arm this will have the effect of compressing the torsion bar to get the ball joint nut on.
Hi Henk, I know this is a long time ago. Can you please let me know how many splines there was on both inner and outer front CV's? I have a 2005 Pajero 3.2 DID. Regards, Cassie
Post Reply